
LMS Education is our original education-focused Blogger template. With a powerful shortcode system, it makes publishing courses, lessons, and tutorials effortless with auto-generated post lists, a testimonials slider, labels gallery, and integrated contact form. It has two versions: the Pro version adds dark mode, a blog post section, social icon auto-detection in sidebar and footer, an improved labels gallery, campus mosaic gallery, and credit removal, while the Free version is fully functional with all core features.
Template Options Widget
The Template Options gadget (LinkList46) sits in your Layout’s settings section. It lets you control core layout and styling without touching code.

| Setting | Values | Default | Description |
|---|---|---|---|
| Sidebar Location | left, right, none | right | Moves the sidebar or hides it entirely |
| Top Menu Is Always Visible | true, false | true | Keeps the navbar sticky on scroll |
| Header Height | Number (pixels) | 560 | Header section height on desktop |
| Force Uppercase In Titles | true, false | false | Transforms all heading and post titles to uppercase |
| Dark Mode Pro | true, false | true | Enables dark mode with Light/Dark/Auto switcher |
| RTL Direction | true, false | false | Flips layout to right-to-left for Arabic, Hebrew, etc. |
Top Menu
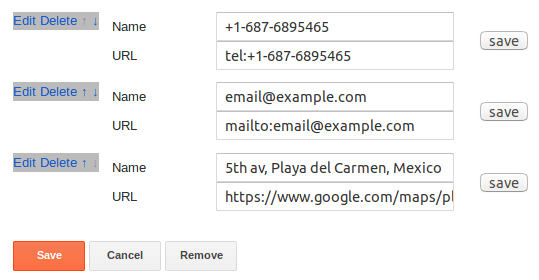
The Top Menu is based on a Links List Gadget/Widget, it automatically shows icons for a telephone number, email and location.

The menu will identify email address and phone number and add the corresponding icon, for the location icon you just need to be sure it includes the word “map” in any place inside the URL. If your URL doesn’t have this word, you can add #map at the end of you URL. Example:
https://miblog.blogspot.com/p/about/#mapFull gadget example:
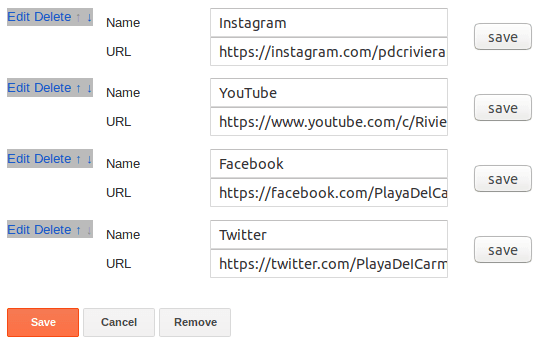
Top Social Media Menu

The Top Social Media Menu is also based on a Links List gadget. This menu will turn your social media links into the correspondent icons.
Full gadget example:
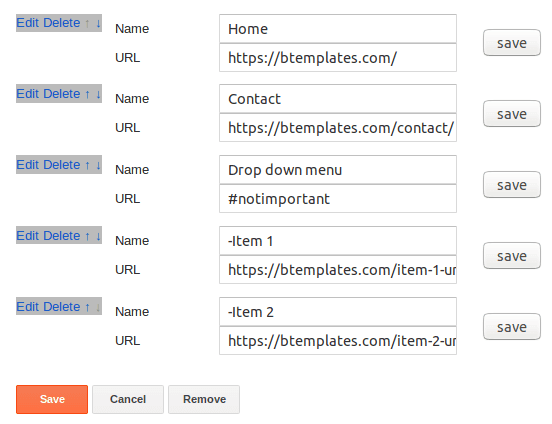
The Main Menu support drop down sub items. It works based on a Links List gadget. So, to add a regular menu item (without drop down sub items) you just add a normal link, example:
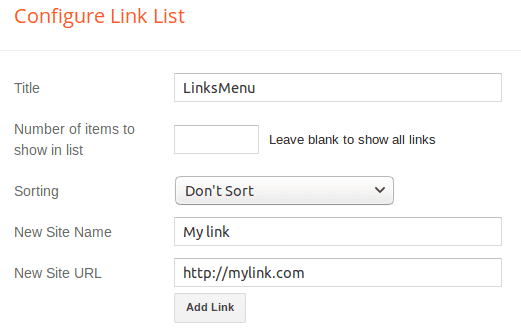
To add a menu item with ONE level drop down sub items:
1. Crate a regular link, in this case the URL is not relevant.
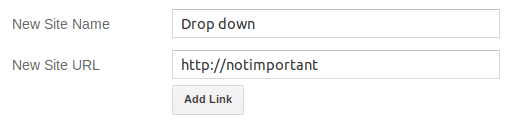
2. Create a second link, but this time add a dash at the beginning of the New Site Name field and the correspondent URL. This is going to be the first element of your drop down menu.
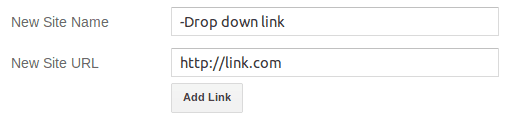
3. Add as many element as you need, but remember to add the dash at the beginning of each Site Name.
Full gadget example:
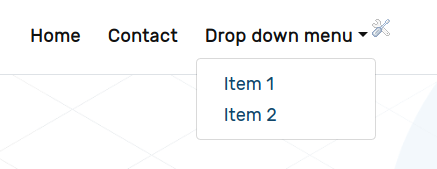
Result:
To add a menu item with TWO levels drop down sub items:
1. Crate a regular link, in this case the URL is not relevant.
If you want to add a list of posts with a specific Label, add a new link following the next format:
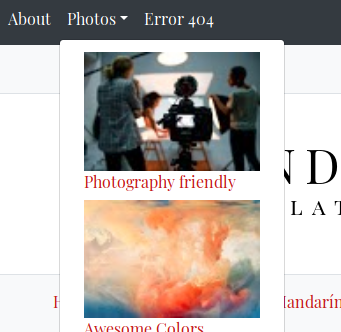
tag:TagName-NumberOfPost-DisplayImageExample: To show 5 posts from the label called ‘Photos’ with thumbnail, you should write:
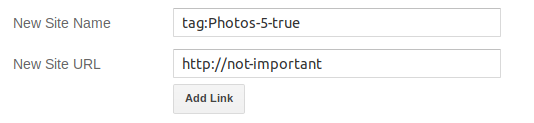
The result is going to be something like:
Dark mode switcher Pro only
To add the dark mode toggle to your navbar, create a link with Site Name set to theme and any URL. The template replaces it with a dropdown offering Light (sun icon), Dark (moon-stars icon), and Auto (half-circle icon, follows system preference).
Header
Header background image
The header background image works using an Image gadget, to change it, go to your Blogger panel, then Layout and look for Header Background, click edit and add your new image.

To better results, use an image at least 1600px wide.
Blog title or Logo
You can change, delete or add a logo to your blog going to your Blogger panel, then Layout, look for Page Header Gadget and clicking on edit.

You also can edit your Blog title and description with this option.
Homepage Sections
All homepage sections appear only on the homepage. Each is powered by an HTML widget that contains a single shortcode line.
| Section | Widget ID | Default Shortcode | Display Style |
|---|---|---|---|
| Courses | HTML49 | 6-latest-350px-course | Course cards with author, date, excerpt |
| Testimonials | HTML59 | 3-tag:Testimonials-250px-testimonial | Carousel slider with avatar and quote |
| Latest Blog | HTML79 Pro only | 6-tag:Blog-350px-bloglist | Blog post cards with date and excerpt |
| Featured Video | HTML96 | 1-tag:Videos-800px-video | YouTube embed from latest labeled post |
| Labels Gallery | Label3 Pro / HTML (Free) | Auto-generated (Pro) / Static cards (Free) | Image gallery from selected labels |
| Contact | ContactForm1 | Native Blogger form | Name / Email / Message |
| Campus Gallery | HTML98 Pro only | 4-tag:Campus-500px-mosaic | 4-column image mosaic with tags |
| Blocks Menu | LinkList63 | Icon-based quick links | Home page navigation blocks |
To edit which posts appear in a section:
- Go to Layout and find the section on the homepage
- Click the Edit icon


- Change the shortcode to point to your label. For example, to show 6 posts from a label called “Courses” in course card style:
6-tag:Courses-350px-course - To show the latest posts regardless of label, use
latest:6-latest-350px-course - Save the gadget
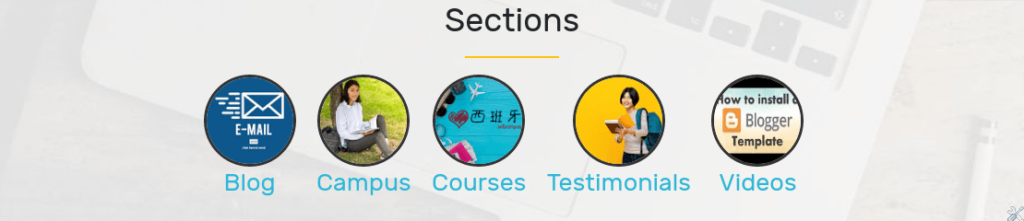
Displayed only on the home page, the blocks menu uses a Links List gadget. Since it doesn’t support drop down item, you can, delete or edit item as normal Links List gadget and these will be turn into blocks.
Home page Posts list 1: Courses

Both, the Pro and Free version has the first list of posts displayed in the home page. You can edit this area to show the latest posts or posts under a specific label.
To edit this area, click the edit icon ![]()
![]() . To display the 6 latest posts (default) use this line:
. To display the 6 latest posts (default) use this line:
6-latest-350px-courseTo display the 6 latest posts under the tag “Courses”, for example, use this line:
6-tag:Courses-350px-courseLabels gallery Pro
In the Pro version of the template we added an new and easy way to display your blog’s labels, it’s a gallery that display the labels you want. In the Free version you also has this section, but you need to use HTML code to add name, link and thumbnail for each label.
To choose which labels to show, you just need to click on the Edit icon on the gadget ![]()
![]() . Click on Selected Labels, then edit, then click on the labels you want to display, click Done and Save the changes.
. Click on Selected Labels, then edit, then click on the labels you want to display, click Done and Save the changes.
Testimonials slider
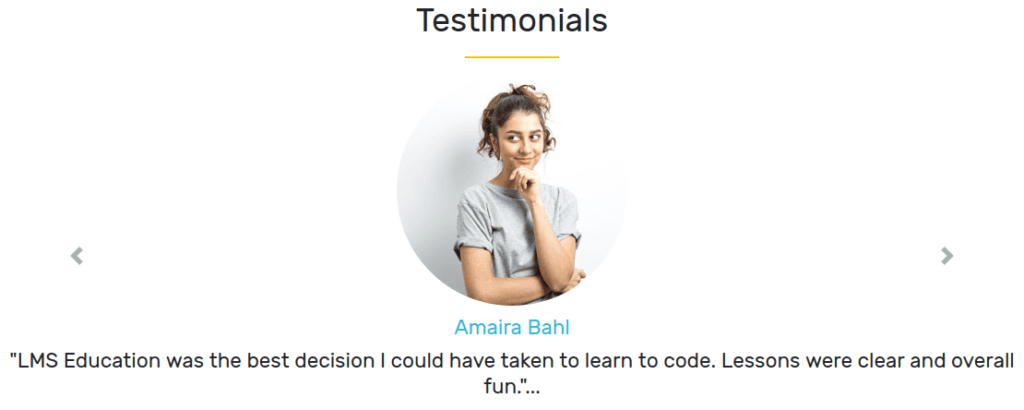
This section is perfect to add Testimonials about your services or products, but since this is also a list of posts, you can add any content here. You just need to specify the label name you want to use.
For example, to display the 3 latest posts under the label “Testimonials”, click on the edit icon ![]()
![]() and you use this line:
and you use this line:
3-tag:Testimonials-250px-testimonialWidget Title Markers
Adding a description (-desc:)
Most gadgets in Blogger don’t allow you to add a text description on them, but sometimes a description is very useful. To add a text description under the title of any gadget, change the title of the gadget following this format:
Title-desc:DescriptionWhere:
- Title – Is the title you want for this widget.
- Description – Is the text description to display under the title.
Example: The Search Box gadget doesn’t have a field to add a description, to add one, we can write the following in the title field:
SEARCH-desc:Find courses, lessons and tutorials.The gadget would look like:
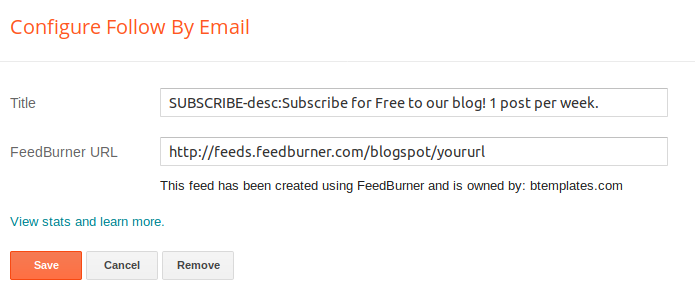
And the result would looks like:

Home page Posts list 2: Blog Pro only
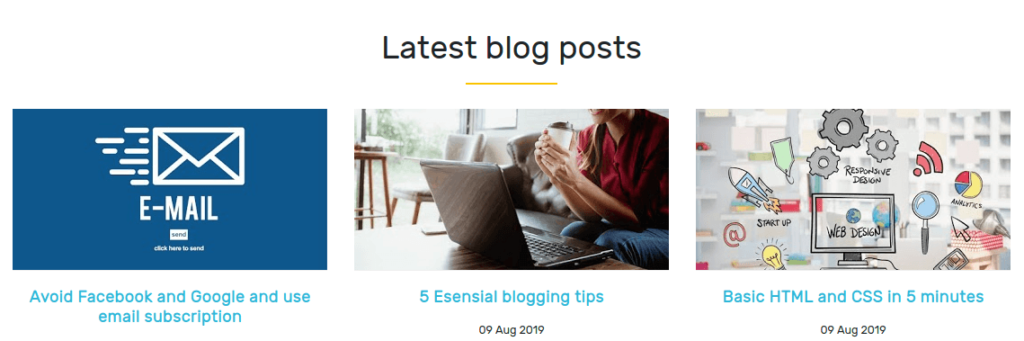
This section is only available in the Pro version. Here you can display the latest posts in your blog or the latest posts under a specific label.
For example, you display the latest 6 posts under the label “Blog”, click on the edit icon ![]()
![]() and use this line:
and use this line:
6-tag:Blog-350px-bloglistLatest video Section
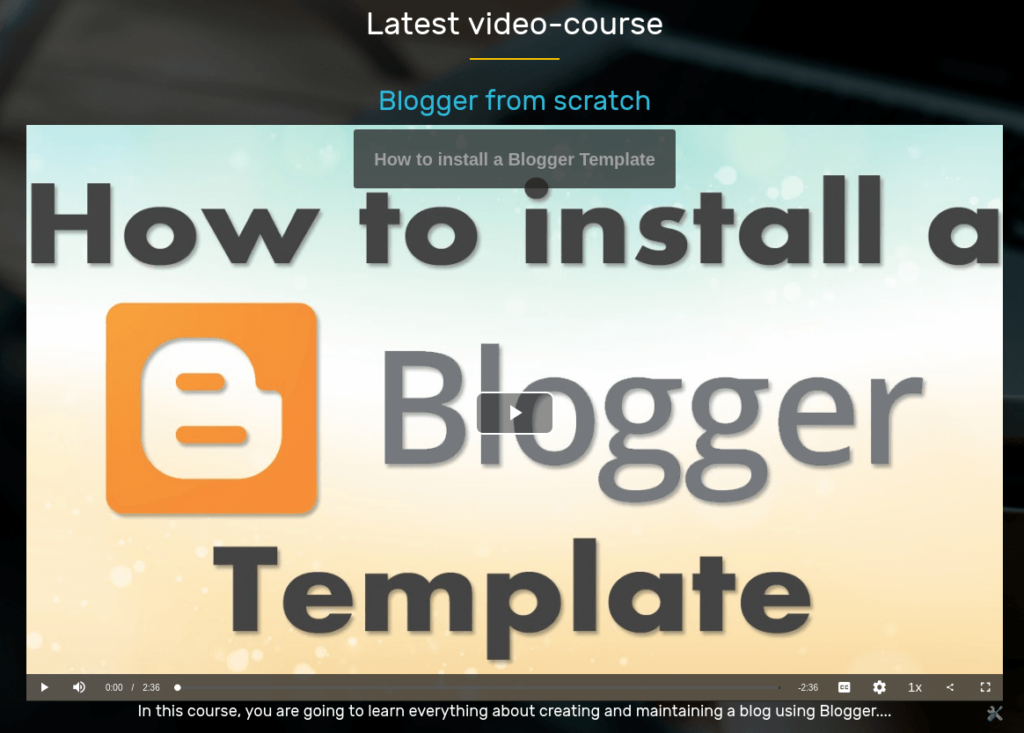
In this section you can display the video inside the latest post of a specific label.
For example, to display the video in the latest post published under the label “Videos”, click the edit icon ![]()
![]() in this area and use this line:
in this area and use this line:
1-tag:Videos-800px-videoShortcodes Reference
Post List Shortcode (in HTML widgets)
{N}-{postsType}-{size}px-{style}Parameters:
N— number of posts to showpostsType—latest(most recent) ortag:LabelName(posts under a specific label)size— thumbnail width in pixelsstyle— display style (see table below)
Available styles:
| Style | Description |
|---|---|
list (default) | Thumbnail + title + summary + date |
course | Card with author, date, excerpt, thumbnail overlay |
bloglist | Card with date, excerpt, hover thumbnail zoom |
testimonial | Carousel slider with avatar, name, location |
mosaic | Image grid with overlay title and tags |
video | Latest YouTube embed from post content |
simplelist | Minimal list with chevron links |
menulist | Compact items with optional thumbnail (dropdown menus) |
Real-world examples:
6-latest-350px-course             Latest 6 posts as course cards
3-tag:Testimonials-250px-testimonial  3 testimonials in slider
1-tag:Videos-800px-video          Latest video from "Videos" label
4-tag:Campus-500px-mosaic         Campus gallery in 4-column mosaic
3-latest-65px                     Latest 3 posts, sidebar list
6-tag:Blog-350px-bloglist         Latest 6 blog posts as cards
Comments Shortcode
N-commentsExample: 3-comments — displays 3 recent comments with avatars and snippets. Best used in sidebars or footer columns.
Shortcodes Inside Posts
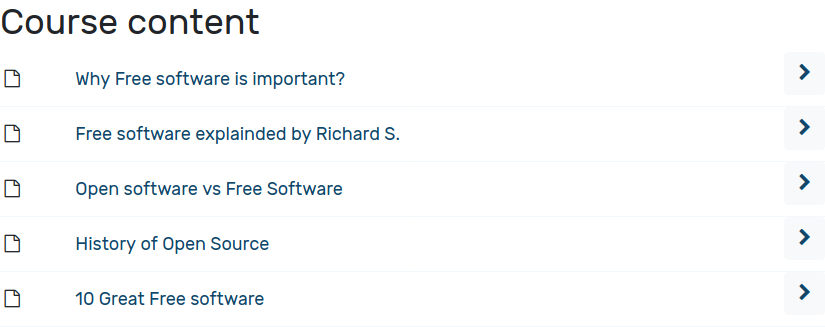
In a education website, sometimes is very useful to display the of post under a specific label, for example to display the content of online course. In this template you can create this list with just one line.
For example, to display the latest 50 posts inside the label “Open source”, you just need to add inside you post this line:
[posts--tag:Open Source--50]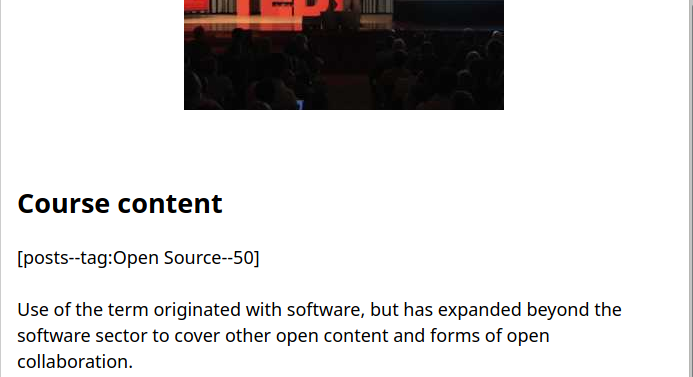
Dark Mode Pro only
The Pro version includes a full dark mode implementation using Bootstrap 5.3’s data-bs-theme attribute. All colors, shadows, and surfaces adapt automatically.
How to enable it
- In Template Options, set Dark Mode to
true. - Add a LinkList item with Site Name set to
themeto your Main Drop Down Menu gadget (LinkList78).
The template replaces the theme item with a dropdown offering three options:
- Light — sun icon (
bi-sun-fill) - Dark — moon-stars icon (
bi-moon-stars-fill) - Auto — half-circle icon (
bi-circle-half, follows system preference and updates in real time)
Dark Mode Logo
To use a different logo in dark mode:
- Go to Layout → settings section
- Add an Image gadget titled
Dark Mode Logo (Optional) - Upload an alternative logo designed for dark backgrounds (lighter colors, no dark elements)
The template swaps logos automatically when dark mode is active and reverts when switching back to light mode.
Persistence
The theme preference is stored in localStorage and persists across sessions. The Auto mode listens for OS-level prefers-color-scheme changes via matchMedia and updates the page in real time without a refresh.
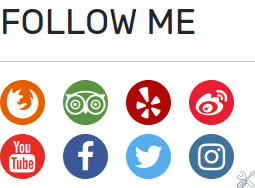
In this template you can add social icons to the sidebar or footer in a very easy way (Pro version), you just need to edit or create a Links List gadget and add all your social media links there, then your links are going to be transformed in icons automatically.
Example:
Sidebar Widgets
| Widget | Gadget | Notes |
|---|---|---|
| Search | BlogSearch43 | Google-styled search form |
| Latest Posts | HTML67 | Default: 3-latest-65px (latest 3 posts, list style) |
| Follow Me | LinkList73 | Auto-detected social icons Pro only |
| Categories | Label1 | Label cloud with post counts |
| About | Profile1 | Author/team profile with avatar |
Latest comments widget
To add a Latest comments widget you just need to add a new HTML gadget with the content following this format:
NumberOfComments-commentsWhere:
NumberOfComments is the number of comments you want to display.
Example, to add a list with the latest 3 comments the content in the HTML gadget would be:
3-commentsThe footer has a 3-column layout:
| Column | Widget | Description |
|---|---|---|
| Footer 1 | PopularPosts2 | Popular posts with thumbnails |
| Footer 1 | Label2 | Category label list |
| Footer 2 | HTML98 | Campus gallery via shortcode Pro |
| Footer 2 | LinkList73 | Follow Me social icons Pro |
| Footer 3 | HTML63 | Recent comments (default: 3-comments) |
| Footer 3 | Profile1 | About section with avatar |
The footer bottom bar includes an auto-updating copyright year and a menu.
Post Features
Every post includes:
- Breadcrumbs — Home · Label · Post Title navigation on single post pages
- Author Box — Profile image, name, and description below each post
- Related Posts — Auto-generated based on post labels with thumbnail previews
- Post Pager — Previous and next post navigation with card-style thumbnails
- Share Buttons — Email, Facebook, Twitter, Pinterest, and WhatsApp sharing
Customization
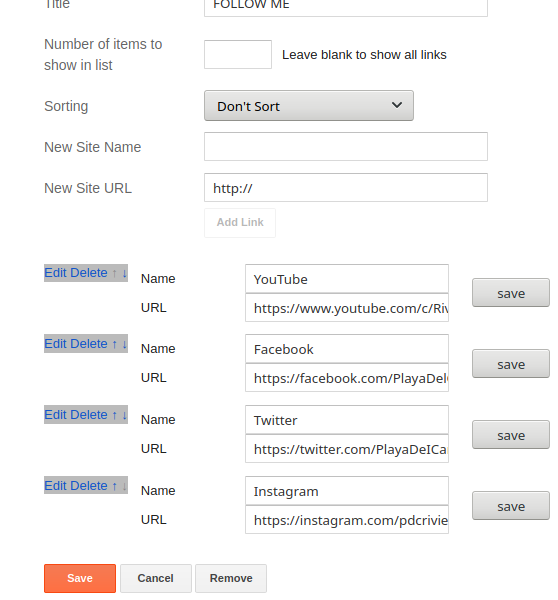
Main font family and colors
To edit the current main font family and the color of some of the elements in the template, in your Blogger dashboard go to Layout, the look for the link to the Theme Designer. Once there, go to Adjust widths, here you can change the font and some colors.
Avatar/Profile Image
The template uses Blogger’s built-in profile image system. To update your avatar/profile image that appears in the template, you need to update your Blogger profile picture. Once you change it there, it will automatically update throughout the template.
Quick steps: Go to blogger.com/edit-profile.g → scroll down to Profile Photo → Remove image (if needed) → upload your new avatar → Save profile.
FAQs
How do I change the header background?
Go to Layout → find the Header Background Image gadget → click Edit and upload a new image (1600px wide recommended).
How do I edit the blog title or logo?
Go to Layout → Page Header section → click Edit on the Header gadget. You can change the title, description, and upload a logo image.
How do I change which posts appear in the Courses section?
Edit the HTML gadget in the Courses List section and change the shortcode. Example: 6-tag:MyLabel-350px-course.
In the Template Options gadget, set Sidebar Location to none.
In the Template Options gadget, set Top Menu Is Always Visible to true.
How do I add a list of posts inside a post?
Use the post-body shortcode: [posts--tag:LabelName--NumberOfPosts] anywhere in your post content. Example: [posts--tag:Course 1--10].
Edit the LinkList gadget in the Top Links Menu section (for top menu icons) or the FOLLOW ME gadget (for sidebar/footer icons). Add your profile URLs as links — the template detects each network automatically.
How do I add a description to a widget?
Append -desc:Your description to the widget’s title field. Example: Courses-desc:Explore our latest courses and tutorials.
How do I update the copyright year?
The template automatically updates the copyright year in the footer — no action needed.
How do I enable dark mode? Pro only
Set Dark Mode to true in Template Options, then add a LinkList item with the text theme to your main menu (LinkList78).
How do I add a dark mode logo? Pro only
Add an Image gadget in the settings section titled Dark Mode Logo (Optional) and upload your alternative logo.
How do I enable RTL direction?
In the Template Options gadget, set RTL Direction to true. The template loads Bootstrap’s RTL CSS and flips the entire layout for right-to-left languages.
Changelog
- 23-05-2026 – Added RTL direction toggle in Template Options. Bootstrap 5.3.3 RTL CSS is loaded when enabled. Works cross all versions (Free, Pro, Demo).
- 23-05-2026 – Added dark mode support to Pro and Demo versions with localStorage persistence, prefers-color-scheme listener, and auto logo swap. Upgraded Bootstrap from 4.3.1 to 5.3.3.
- 22-05-2026 – Migrated icon library from Font Awesome 4.7 to Bootstrap Icons 1.11.3. Added
data:view.isPreviewconditional for template preview support. - 20-12-2022 – Added social icons for Tiktok and Mastodon on Pro version. Minor Javascript bug fixed due to format change in image URLs.
- 19-02-2022 – Scripts fixed due to format change in image URLs
- 21-09-2021 – Mail subscription gadget removed due to Google’s questionable decision to discontinue it.
- 16-03-2021 – Fixed bug on dropdown menu when showing a second level item.
- 23-08-2020 – Added Template options gadget. Fixed: Sidebar gadgets visible from Layout section.
- 17-07-2020 – Fixed thumbnails from YouTube with low quality. Added third level of item in drop down menu.
- 28-06-2020 – Fixed: post thumbnails are more compatible with the new Blogger.
- 24-06-2020 – Fixed pages’ “read more”.
- 08-06-2020 – Initial release.