
Welcome to the documentation of Maya Blogger Template. Maya is the first blogger template we publish with 2 versions: A Pro version with support and lots of features (and without credits) and a Free version with less features but totally functional.
Content:
Main Features:
– Full responsive
Maya uses Bootstrap 4 as CSS framework and jQuery to make an consistent experience across different devices. Even you YouTube videos are fully responsive.
– Display posts anywhere.
Thanks to the Blogger’s feed json api adding lists, galleries and even menu items containing your latest post, posts by Label or latest comments never was so easy.
– Labels gallery (Pro version only).
We invented a new way to display your Labels(tags), using the image of the last post in every label and the best part is that you can customize it without coding.
– Related posts (Pro version only).
Automatically generated related posts base on Labels and without repeating the current post.
– Icons Menu.
You have a menu based on the travel icon set created by Laura Reen to give more personality to your design. You can edit without writing a line of code on the pro version or editing some simple HTML on the free one.
– Social Icons.
You can add, edit or delete social icons at different locations just editing a standard List of Links on the pro version or some HTML in the free one.
– SEO Friendly.
We have focused on create a friendly design, firstly for human but also to search engines. Using post summaries, breadcrumbs, cdn’s, asynchronous javascript, etc.
Documentation
Enable responsive mobile version
In order to get advantage of the full responsive version, you must to disable the Blogger’s default mobile version, to do it, go to Theme, then look for ‘Mobile version’ and click on the configuration icon ![]()
![]() . Then choose: “No. Show desktop theme on mobile devices.”
. Then choose: “No. Show desktop theme on mobile devices.”

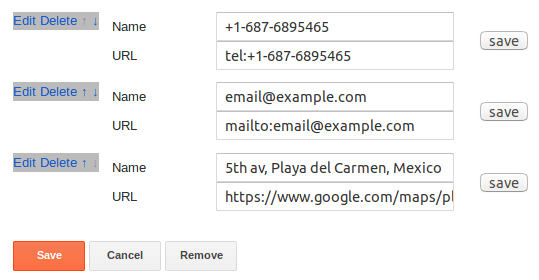
Top Menu
The Top Menu is based on a Links List Gadget/Widget, it automatically shows icons for a telephone number, email and location.

The menu will identify email address and phone number and add the corresponding icon, for the location icon you just need to be sure it includes the word “map” in any place inside the URL. If your URL doesn’t have this word, you can add #map at the end of you URL. Example:
https://miblog.blogspot.com/p/about/#mapFull gadget example:
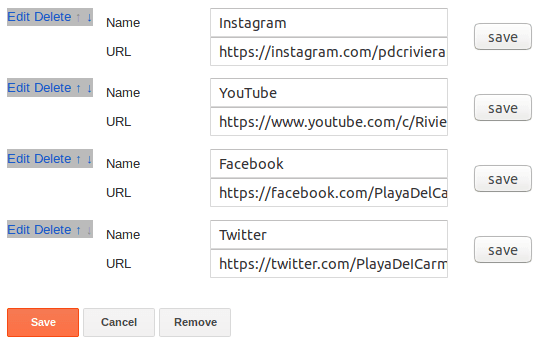
Top Social Media Menu

The Top Social Media Menu is also based on a Links List gadget. This menu will turn your social media links into the correspondent icons.
Full gadget example:
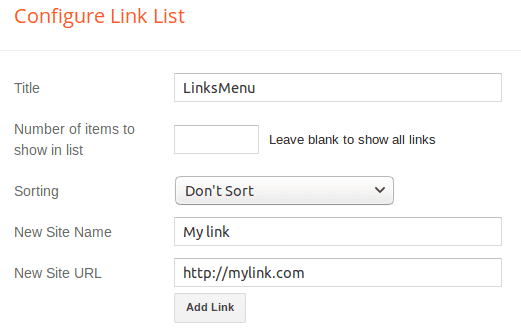
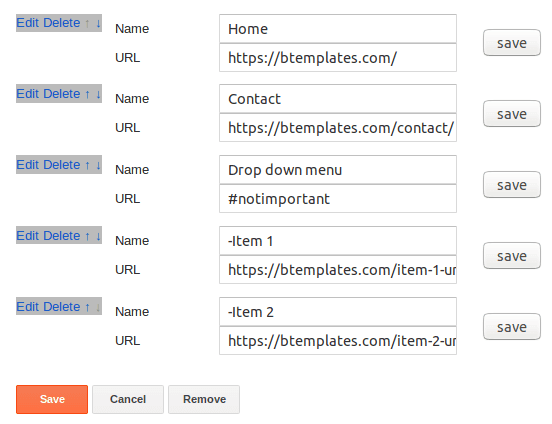
Main drop down menu
The Main Menu support drop down sub items. It works based on a Links List gadget. So, to add a regular menu item (without drop down sub items) you don’t just add a normal link, example:
To add a menu item with ONE level drop down sub items:
1. Crate a regular link, in this case the URL is not relevant.
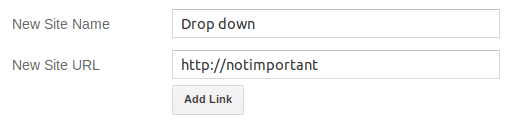
2. Create a second link, but this time add a dash at the beginning of the New Site Name field and the correspondent URL. This is going to be the first element of your drop down menu.
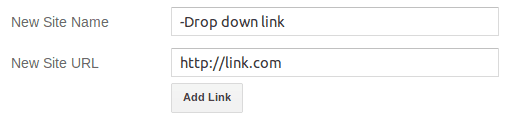
3. Add as many element as you need, but remember to add the dash at the beginning of each Site Name.
Full gadget example:
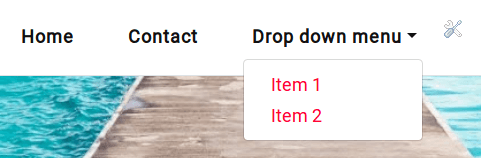
Result:
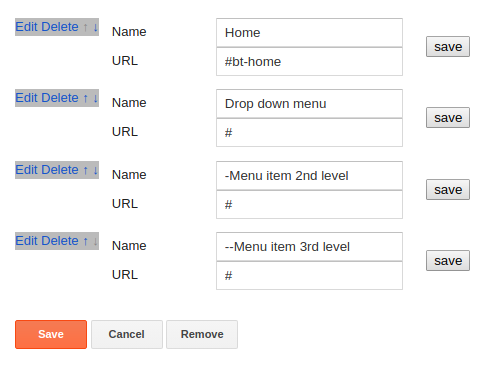
To add a menu item with TWO levels drop down sub items:
1. Crate a regular link, in this case the URL is not relevant.
2. Create a second link, but add ONE dash at the beginning of the New Site Name field and the correspondent URL. This is going to be the first element of your drop down menu.
3. Create a third link, but this time add TWO dash at the beginning of the New Site Name field and the correspondent URL. 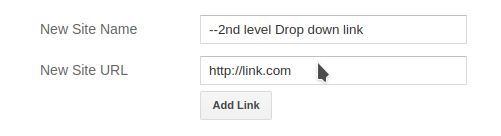 Full gadget example:
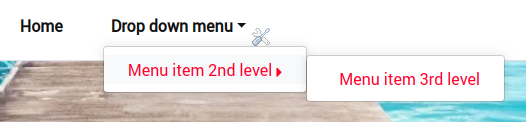
Result:
Labels gallery
In the Pro version of the template we added an innovative way to display your blog’s labels, it’s a modal windows that display all the labels you choose with thumbnails.
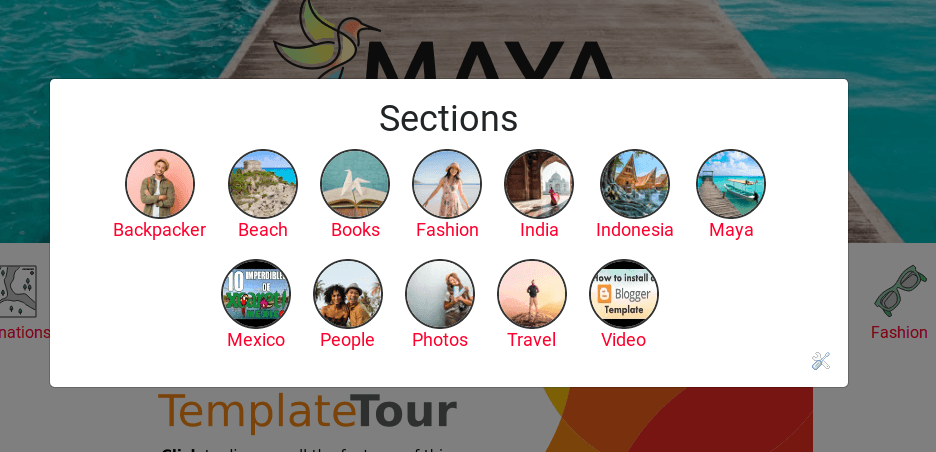
To use, you just need to create a link on a menu, text gadget, image gadget or inside a post content with the next anchor:
#bt-tags
Example: On a menu the link would looks like:

On a text gadget or inside a post content it could looks like:
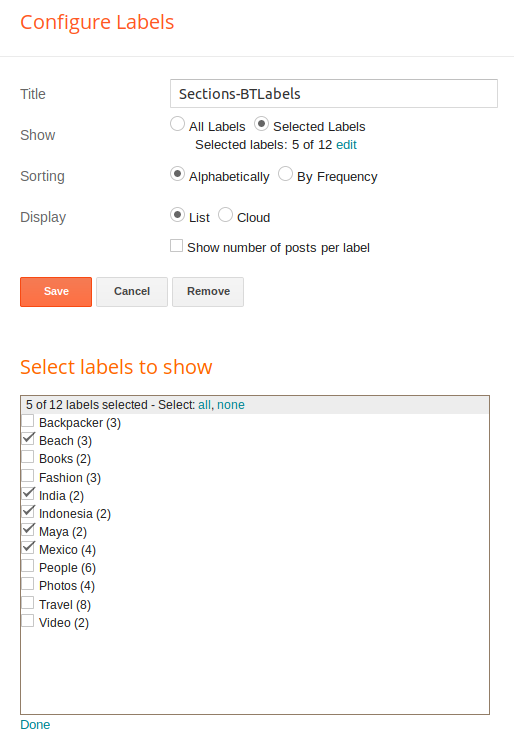
<a href="#bt-tags">Sections</a>To choose which labels to show, you just need to click on the Edit icon on the gadget ![]()
![]() . Click on Selected Labels, then edit, then click on the labels you want to display, click Done and Save the changes.
. Click on Selected Labels, then edit, then click on the labels you want to display, click Done and Save the changes.
You can also edit the Title for this gadget but you must add:
-BTLabelsAt the end of your new title. Example:
Header background image
The header background image works using an Image gadget, to change it, go to your Blogger panel, then Layout and look for Header Background, click edit and add your new image.

To better results, use an image at least 1600px wide.
Blog title or Logo
You can change, delete or add a logo to your blog going to your Blogger panel, then Layout, look for Page Header Gadget and clicking on edit.
You also can edit your Blog title and description with this option.
Icons Menu
On this template we incorporated an menu with icons related to travel. It, not surprisingly, works based on a Link List gadget for the Pro version and on code HTML to the free version.
For the Pro version: Edit the gadget adding your own links. To attach an icon, you just need to add an “anchor” at the end of the link, the anchor depends on the icon you want. There are in total 20 different icons, the anchor for each are:
| Anchor | Icon |
| #wallet |  |
| #destinations |  |
| #stories |  |
| #passport |  |
| #beach |  |
| #photos |  |
| #glasses |  |
| #medicine |  |
| #apps |  |
| #watch |  |
| #tool |  |
| #sleepmask |  |
| #haircomb |  |
| #toothbrush |  |
| #compass |  |
| #water |  |
| #cometicsbag |  |
| #boardingpass |  |
| #bag |  |
| #ebooks |  |
Example. Let say you want to add the #destinations icon to the next link: https://myblog.blogspot.com/search/label/Travel ; the final link will be:
https://myblog.blogspot.com/search/label/Travel#destinationsAnd the result:
For the Free version the process is not automatic and you need to edit the HTML directly. Example:
<li><a href="DESTINATION_LINK"><div class="menu-icon"><img src="IMAGE_URL" heigh="64" width="64" /></div> <span>LINK_TEXT</span></a></li>Where DESTINATION_LINK is the destination url, IMAGE_URL is the icon url and LINK_TEXT is the text you want to display under the icon.
Lists of posts: latest or by label
To display the latest posts in your blog or the latest blog in a specific label, you just to add a new HTML gadget in the place you want to show it and use the next format:
NumberOfPosts-PostsType-ThumbnailSize-DisplayStyleWhere:
- NumberOfPosts is the quantity of posts you want to display.
- PostsType can be either:
- latestposts – To show the latest posts, regardless of the label.
- tag:LabelName – To show the latest posts in a specific Label, where LabelName is the name of the label, written exactly as appears in your posts.
- ThumbnailSize – Is the size in pixel of the image.
- DisplayStyle – It can be:
- slider – To show an slider.
- list – To show a list of posts. Ideal for the sidebar or the columns in the footer.
- mosaic – To show as a gallery. Note that the NumberOfPosts must be a multiple of 4.
For example: To show a list of 8 posts, labeled ‘My Recipes’ and a 75px width thumbnail, you should add a HTML gadget with the next content:
8-tag:My Recipes-75px-list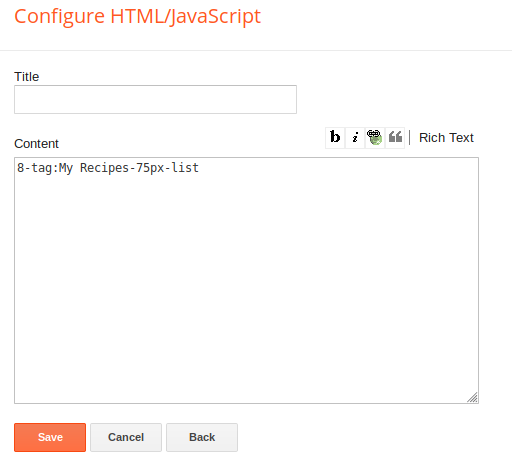
Posts gallery
To edit the gallery gadget or add a new one, you have to follow the same process as the slider or the lists of posts, modify/add a HTML gadget using the format:
NumberOfPosts-PostsType-ThumbnailSize-DisplayStyle- NumberOfPosts is the quantity of posts you want to display.
- PostsType can be either:
- latestposts – To show the latest posts, regardless of the label.
- tag:LabelName – To show the latest posts in a specific Label, where LabelName is the name of the label, written exactly as appears in your posts.
- ThumbnailSize – Is the size in pixel of the image.
- DisplayStyle – It can be:
- slider – To show an slider.
- list – To show a list of posts. Ideal for the sidebar or the columns in the footer.
- mosaic – To show as a gallery. Note that the NumberOfPosts must be a multiple of 4.
For example, to display a gallery of 8 posts (which is a multiple of 4), with image size of 500px and labeled ‘Portfolio’, the format would be:
8-tag:Portfolio-500px-mosaic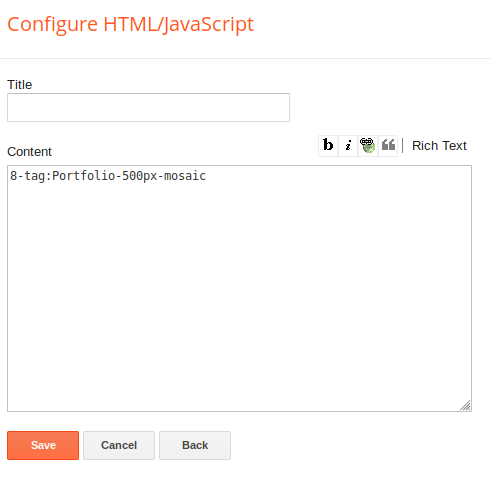
Gadget descriptions
Most gadgets in Blogger don’t allow you to add a text description on them, but sometimes a description is very useful. To add a text description under the title of any gadget, change the title of the gadget following this format:
Title-desc:DescriptionWhere:
- Title – Is the title you want for this widget.
- Description – Is the text description to display under the title.
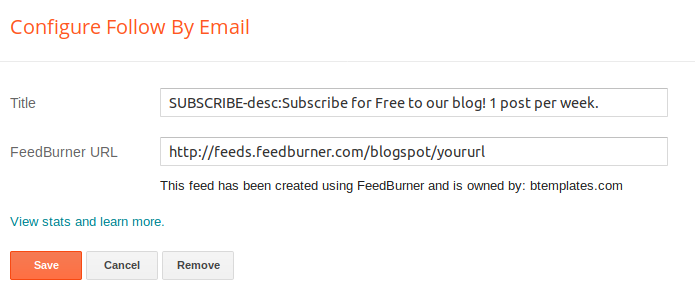
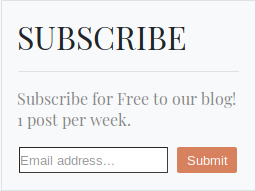
Example: The Follow by Email widgets don’t have a field to add a description, to add one, we can write the following in the title field:
SUBSCRIBE-desc:Subscribe for Free to our blog! 1 post per week.The gadget would look like:
And the result would looks like:
Latest comments widget
To add a Latest comments widget you just need to add a new HTML gadget with the content following this format:
NumberOfComments-commentsWhere:
NumberOfComments is the number of comments you want to display.
Example, to add a list with the latest 3 comments the content in the HTML gadget would be:
3-commentsMain font family and colors
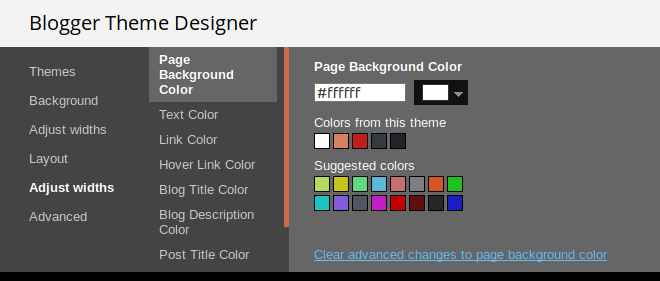
To edit the current main font family (Playfair Display) and the color of some of the elements in the template, in your Blogger dashboard go to Layout, the look for the link to the Theme Designer. Once there, go to Adjust widths, here you can change the font and some colors.
Changelog
- Version 1.0.9 – 20-12-2022 – Added social icons for Tiktok and Mastodon on Pro version. Minor Javascript bug fixed due to format change in image URLs.
- Version 1.0.8 – 19-02-2022 – Scripts fixed due to format change in image URLs
- Version 1.0.7 – 01-05-2021 – Fixed a small Javascript bug affecting the top and main menu.
- Version 1.0.6 – 16-03-2021 – Fixed bug on dropdown menu when showing a second level item.
- Version 1.0.5 – 17-07-2020 -Fixed thumbnails from YouTube with low quality. Added third level of item in drop down menu.
- Version 1.0.4 – 28-06-2020 – Fixed: post thumbnails are more compatible with the new Blogger.
- Version 1.0.3 – 24-06-2020 – Fixed pages’ “read more”.
- Version 1.0.2 – 11-06-2020 – Small CSS and Javascript fixes. Page 404 now can be customized, now is using gadgets in Pro version.
- Version 1.0.1 – 09-01-2020 – Small CSS fixes. Avatar size fixed for not rectangular images.
- Version 1.0 – 09-07-2019 – Initial release.