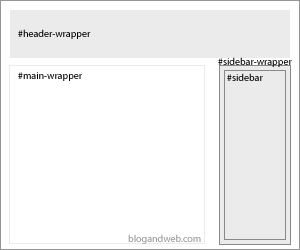
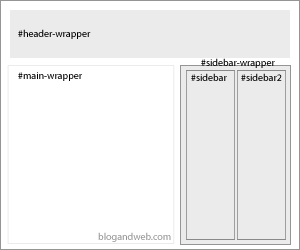
How to add a new sidebar to a Blogger template is one of the most common questions between the users of the platform for blogs from Google. Adding a second sidebar varies in complexity according to the design in question, so, while some require only a few lines of CSS modification, others will need a total refurbishment that may make it more convenient to change the design.
Broadly speaking the process is as follows:
- Analyze the structure and style of the template.
- Adding a new editable area, ie the area to add new gadgets.
- Modify styles.
To follow this without issues this and any other tutorial that involves making changes in the structure of a blog or website is very advisable to know some html and CSS. So:
Analyze the structure and style of the template

For the majority of the templates, and specially Blogger ones, have a very similar structure, a header with title and description, a wrapper with the main column, a sidebar, and a footer with credits and some other information.
In this case our interest is the wrapper in which we have the content and the sidebar, starting from the Blogger code (Design/Edit HTML) it looks something like this:
<div id='content-wrapper'>
	<div id='main-wrapper'>
		<b:section class='main' id='main' showaddelement='no'>
		<b:widget id='Blog1' locked='true' title='Blog Entries' type='Blog'/>
		</b:section>
	</div>

	<div id='sidebar-wrapper'>
		<b:section class='sidebar' id='sidebar' preferred='yes'>
			<!-- Sidebar's widgets and gadgets code -->
		</b:section>

	</div>
</div>
This varies a little from one template to the otherplate but broadly speaking is very similar to this. Both main-wrapper and sidebar-wrapper are defined by CSS styles which determine their width, depth and some other features. So, first things first, search this features looking for something like this:
#main-wrapper {
float:left;
width:620px;
/*.... more attributes ... */
}
#sidebar-wrapper {
float:right;
width:300px;
/*.... more attributes ... */
}
Note: It is likely that you won’t find them all together or exactly the same and sometimes, more than once.
Here we need to be aware of the width of each element, to add a new bar we’ll need to change the distribution. By adding the width of the example code we have a 920px total, which will be the available space for the main wrapper and the sidebars.
Add a new editable area.
Adding a new editable area in Blogger is very simple, these are defined by "section" elements that when included into the code they may contain gadgets (page elements). The code for the new editable area is something like:
<b:section class='sidebar' id='sidebar2' preferred='yes'></b:section>And to add a new editable area, we just need to add this code just after the existing editable area:
<div id='content-wrapper'>
	<div id='main-wrapper'>
		<b:section class='main' id='main' showaddelement='no'>
		<b:widget id='Blog1' locked='true' title='Entradas del blog' type='Blog'/>
		</b:section>
	</div>

	<div id='sidebar-wrapper'>
		<!-- Existing editable area -->
		<b:section class='sidebar' id='sidebar' preferred='yes'>
			<!-- Sidebar's gadgets and widgets code -->
		</b:section>

		<!-- New editable area -->
		<b:section class='sidebar' id='sidebar2' preferred='yes'></b:section>

	</div>
</div>
We have to be careful with the ID of the new area, in must not exist in any other "section" element, that’s why in the example it is shown as "sidebar2". The class cannot be repeated and in case of sidebars it is even convenient to be that way. As it is a new area, it doesn’t need to have gadget code, these will be integrated automatically when we add a new gadget from "Page Elements".
Now we have a editable zone but as the template is not prepared it may be shown corrupted, so we need to do some changes.
Modify sytles

We already know the total available width and we have an editable area, so now we have to assign width to each element. Following the example; main-wrapper gets reduced to 540px and sidebar-wrapper, which now contains both sidebars, gets enlarged to 380px. Fitting styles as follows:
#main-wrapper {
float:left;
width:540px;
/*.... attributes ... */
}
#sidebar-wrapper {
float:right;
width:380px;
/*.... attributes ... */
}
This way the available space for both sidebars is 380px. The most common thing to do is to give them the same width, so they will use 50% of the space each. Starting from the IDs of each editable zone we now assign the width of each on and its location (left – right) in the [i]sidebar-wrapper[/i], by adding these styles:
#sidebar {
width:50%;
float:left;
/*.... any other attributes you may find necessary like: padding, margin, etc ... */
}
#sidebar2 {
width:50%;
float:right;
/*.... any other attributes you may find necessary like: padding, margin, etc ... */
}
With this done now we have 2 sidebars 190px wide each, able to support gadgets.
Observations
Some templates may present issues while changing the sidebar’s or main wrapper’s width, specifically those based on fixed images which obviously will not change their size by reducing width. In this case you may edit those images with Photoshop to fit them to the new width.
Conclusion
All in all, this process might get a bit difficult, mostly if you haven’t got too much knowledge on CSS or if the template has a complex structure. The only thing we can recommend in this case is learning some CSS or look for a 3-column template and customize it. Opinions? Questions? Doubts? Fire them off in the comments.
Rachel February 13, 2010 at 10:38 pm
I have been searching everywhere to find how to add a sidebar to a layout that doesn’t already have it… I haven’t had much luck though. I really like the layout I have, but is it impossible to just create a sidebar when it isn’t made for one. Please help me! I really want to add some features for my tumblr blog, but I can’t because I don’t have the sidebar!
Francisco February 14, 2010 at 1:23 am
Sorry Rachel, this only works with Blogger.com
Geekmundi June 23, 2010 at 9:58 pm
Hola Francisco, por lo que veo hablas ingles tambien. Era para preguntarte si hay alguna forma de diseñar una plantilla propia para blogger desde cero en photoshop u otro programa como dreamweaver y luego aplicarla en blogger sin problema.
Si esto es posible te agradeceria inmensamente que me explicaras el procedimiento o me facilitaras algún tutorial para lograrlo.
Hace rato te sigo en la blogandweb, aproposito, btemplates que relacion tiene con esta ultima?
Salu2 desde COlolmbia amigo y gracias por adelantado.
Yash June 18, 2011 at 8:00 am
nice post, i need a extra widget ,i going to try that one,thankx for the post
kaza July 5, 2012 at 7:39 pm
thanks
Nixon Ok October 3, 2012 at 9:45 am
I’ve been searching for a custom pictured slide bar with 4-5 pictures to post the head of my blog for 3-4 months now,please help me out with this,you can visit my blog and see if you can help me , please ….
jenna October 9, 2012 at 12:55 pm
i use blogger but i am having trouble finding anything in template regarding the “sidebar” i would like to add a sidebar to my blog to incorporate (contact info, pinterest button etc in it) please help 🙂
-thank you!
uzaif December 29, 2012 at 10:06 am
nice article very
helpful
kkarthik March 11, 2013 at 11:06 pm
i just started blogging. i need sidebar in right in between blog post and old sidebar in my blogger template please suggest me to modify my template
thank u friend
Reviewsout May 20, 2013 at 7:58 am
Nice post. i think your code will helps me to put another sidebar in right side. but i want a new sidebar widget in left side of blog. can you help with the code. please..
Nuria May 22, 2013 at 9:49 am
Hola! Está genial explicado. Pero mi problema es que quiero añadir una sidebar a la derecha en la plantilla wu wei para blogger y como el código es diferente no soy capaz!
La verdad es que no tengo ni idea de estas cosas entonces al cambiar un poco ya no puedo.
Gracias de antemano por la respuesta!